
Partnership Table
Facilitation Toolkit
Meeting Planning Tools
Tip for Local Facilitators
-
Adjust agenda timing to fit your group’s size and discussion needs.
-
Use the quarterly agenda for strategic sessions or annual planning.
-
Keep records consistent by using the same attendance and priorities tracker.
-
Consider rotating facilitation duties to foster collaboration and build shared leadership.
This section provides ready-to-use tools, templates and checklists that can be easily adapted for Partnership Table meetings.
Collaborating with various stakeholders and city staff can be complex, so consider the following approaches to scheduling Partnership Table Meetings.
Recurring is easier: Many groups find it simpler to have a regularly scheduled meeting date (e.g., “the second Wednesday of every month at 5:30 PM”) rather than picking a new date each time.
Set the next meeting date before adjourning: Close each meeting by announcing the next meeting date to help participants plan ahead and minimize scheduling conflicts.
Use a simple scheduling tool: If you must schedule digitally, provide
participants with tools not requiring an account to respond (examples below).
-
Doodle: https://doodle.com
-
When2meet: https://when2meet.com
-
LettuceMeet: https://lettucemeet.com
Consider meeting accessibility when setting your meeting: In the invite email, make sure to offer both in-person and remote options when possible and make sure the options are explicitly noted in the invite.
Promote meetings at least two weeks in advance: Make sure to send invitations at least two weeks in advance, with a reminder 2-3 days before the meeting, to help maximize attendance and participation.
PLANNING CHECKLIST
Two Weeks Before Meeting:
-
Confirm date, time, and venue or platform
-
Send save-the-date to members
-
Request updates from project leads
-
Reserve shared space, if needed
-
Confirm technology availability, if needed
-
Confirm accessibility accommodations guests may need
One Weeks Before Meeting:
-
Finalize agenda
-
Prepare and share agenda,
-
meeting logistics and materials
-
Confirm facilitator and note-taker
Day of Meeting:
-
Print or prepare sign-in sheet
-
Test AV or virtual platform
-
Arrive/log in early to greet attendees
After Meeting:
-
Distribute meeting notes within 3 business days and promote and offer registration link for next meeting
-
Update Partnership Table Priorities Tracker
-
Upload materials to shared folder
RESOURCE LINKS
Example template word documents for your convenience, just download, print out, fill in information and use:
Agenda Option # 1
Agenda Option # 2
Agenda Option # 3
Agenda Option # 4
Meeting Sign-in Template
Notetaking and Reporting Tools
Taking notes, tracking notable decisions, and sharing important details captured at each meeting can help you and your attendees keep track of what happens in Partnership Table Meetings. Before the meeting, designate at least one attendee (preferably two if possible) to assist with note taking to ensure all participants have a shared understanding of discussions, decisions, action items, and commitments following the meeting.
Notetaking Elements
After each Partnership Table Meeting, consider sharing notes recapping the following meeting elements.
Meeting Details:
-
Date & time
-
Location
-
Facilitator
-
Attendees
Agenda Items Discussed
-
(Hint: It may be helpful to paste the agenda items in the section before the meeting starts)
Decisions Made: Clearly state what was agreed to and by whom.
Priorities Identified or Updated: List any changes or additions.
Action Items: Include responsible person(s) and deadlines.
Next Meeting Date & Time (confirm before adjourning).
Other Notes: Observations, concerns, or follow-up items.
RESOURCE LINKS
Example notetaking template word documents to use during your meeting:
Notetaking Option # 1
Notetaking Option # 2
Notetaking Option # 3
Priority Tracker
Tracking projects can help your Partnership Table focus on current activities, plan more efficiently and delve into what is most important to your Partnership Table. You can use this Priority Tracker to:
Document and organize the Partnership Table’s ongoing priorities — what the group has decided matters most.
Show progress over time — tracking shifts from “not started” to “complete” with clear dates and responsible parties.
Guide meeting agendas — helping facilitators focus discussion on advancing the most important items.
Prevent duplication or loss of focus — ensuring energy is spent on agreed goals rather than repeating past conversations.
Support external communication — providing a quick, visual summary of work for city leaders, funders, and the community.
RESOURCE LINKS
Example template word documents to track your priorities from meeting to meeting:
Priority Tracking Option # 2
Priority Tracking Option # 1
Smart Goal Tracking Template
Collaborating Tools for Sharing Partnership Table Documents
Making documents easy to share and work on together helps the Partnership Table stay organized, avoid duplication, and keep all members on the same page. Below are some free or low-cost options:
Google Drive (Free with a Google account)
-
What it does: Store, share, and edit documents, spreadsheets, and presentations in real-time.
-
Why it’s useful: Everyone with permission can view or edit the same file without emailing multiple versions of the same document.
-
Tip: Create a shared folder for your Partnership Table so all related documents are in one place.
Microsoft OneDrive (Free with Outlook/Hotmail acct)
-
What it does: Similar to Google Drive but integrates with Microsoft Office tools like Word and Excel.
-
Why it’s useful: Good for teams that already use Microsoft Office products.
-
What it does: Easy-to-use file storage and sharing.
-
Why it’s useful: Simple folder sharing for members who just need to download or upload without editing online.
-
What it does: Visual, bulletin-board style space for posting documents, images, and links.
-
Why it’s useful: Good for brainstorming, idea sharing, or gathering community input in a visual way.
BEST PRACTICES FOR ONLINE SHARING:
Decide on one primary storage space so members know where to find the latest documents and make sure to indicate where documents live when you first upload
Use clear, consistent file names (EX: “CityName_ PT_Notes_2025-08-10”)
Keep a “Read Me First” document in your shared folder explaining how it’s organized and where to find key files.
Periodically review and clean up old files so the shared space doesn’t get cluttered.
Facilitation Strategies: Getting Started
WELCOME AND INTRODUCTIONS
Implementing group agreements, or establishing ground rules and group norms, before beginning your meeting sets expectations for behavior and communication. By grounding attendees in the meeting's purpose, your group discussions will be more effective, inclusive, and focused. Writing and practicing your introduction in advance can help you start smoothly and find your rhythm.
“Welcome, everyone. We’re here to collaborate and help you move this work forward. Before we jump in, let's ground ourselves in a few key agreements to ensure all voices and perspectives are included in this space. These agreements will help us to better listen, connect, and share our experience while making space for one another."
REVIEWING GROUP NORMS (EARLY IN EVERY MEETING, IF ESTABLISHED)
“Let’s start off by centering on our shared agreements to guide how we work together.”
Examples might be practices like:
“Step up, step back.”
“Assume good intent.”
“One mic, one voice.”
INTRODUCTIONS
When new members join the group, always take a moment to give everyone the opportunity to briefly introduce themselves. Try to keep introductions at no more than 30 seconds per person and if you have a large group, be sure to give everyone a moment to state:
Name
Affiliation (if attending from a particular organization)
Identity (this can vary based on group and gathering topic )
Worth noting: In meetings, make sure you are not gendering the group by using words like 'guys' or 'ladies' instead use terms like 'folks' or 'team'.
As a way to get to know each other, many participants find value in starting meetings with a short icebreaker question, even if no new members join. These icebreakers can sometimes reveal commonalities participants were not aware of before. For a list of icebreakers, click here.
HANDLING TENSION AND CONFLICT
Be Aware of Tense Discussions - When tension rises in the group, consider using the 3 Cs: 1. Calm down, 2. Communication, 3. Collaborate; and say something like:
“Let’s pause for a moment because there’s a lot of energy coming from this discussion point, which means we care deeply about this issue. Let’s take a 30- second pause and a few deep breaths to reground ourselves in this space and so that we’re honoring all perspectives and hearing each other fully.”
Should harm occur, consider saying something like:
“Let’s take a brief pause here. While this may not be the intent, we are hearing comments that could negatively impact this group. This is a collaborative space. Mutual care is always a priority. As a reminder, everyone’s perspective and dignity matters here so we encourage you to be considerate and respectful.”
ESTABLISHING GROUP NORMS
Establishing norms at the onset of each meeting ensures shared understanding, sets standards of behavior, and conveys clear group expectations so that participants have guidelines on how to interact and communicate.
“Norms” are statements of shared agreements that should be developed in collaboration with participants. The goal is to establish and “normalize” shared agreements in every meeting so that folks whose interest may compete, or internal cultures may differ can still find common ground for which to collaborate and move the work forward.
Sometimes, a facilitator will need to pause and resurface previous group norms to develop new norms with buy-in from all members. This can also help the group recenter on its purpose and improve the quality of conversations going forward.
Setting Group Norms:
Set the Purpose: Start your meeting by explaining the purpose of group agreements and how they help people feel respected, heard, and valued. Emphasize the importance of collective input (e.g., norms are co-created in community — everyone contributes) while also conveying norms should be flexible, not imposed.
Open the Discussion: Invite group dialogue by asking folks to reflect and share a couple of insights on what makes meetings feel safe, productive, and inclusive. Use a prompt such as:
-
“What helps you feel able to contribute in group settings?”
-
“What behaviors make a meeting work well—or not so well—for you?"
Gather Ideas and Share with Group: Capture suggestions in real time and in multiple formats (e.g., whiteboard, shared document, or flip chart). If hosting a Partnership Table in a virtual setting, consider offering participants several ways to provide and share input: speaking aloud, writing sticky notes, or adding to a shared doc/chat.
Group and Clarify: Identify and share themes across suggestions (e.g., respect, time, participation). Combine similar ideas and check back with the group for clarity: “I’m hearing a theme around making sure everyone has a chance to talk. How does this feel for folks?”
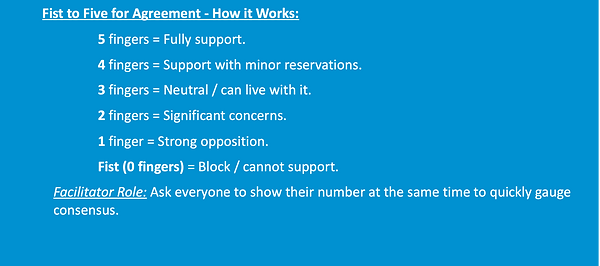
Build Consensus: Use a quick consensus method (like Fist-to-Five or a thumbs up) to confirm shared comfort with the draft norms. Encourage group participation to help generate group consensus but also make sure to give people the option to “pass” if they’re not ready to commit.
Document and Share: Record norms in the meeting notes and circulate them in your follow-up communications. Post meeting norms and drop a link in the chat (if holding meeting virtually) at the beginning of each meeting for easy reference.
Revisit Regularly: Remind participants that norms are living agreements that should be revisited and adapted as needed. Suggest resurfacing them every 6–12 months—or even sooner if challenges arise.
RESOURCE LINKS
Example icebreakers to use during your meeting:
Facilitation Strategies: In-Meeting Techniques
Ensure All Voices Are Heard
Use “Step Up / Step Back” to balance group dynamics and participation.
Here’s how you can explain it to your group:
Step up → For people who are less vocal in group settings, this cue gives them the space to share your thoughts, questions, or reactions.
Step back → For people who have spoken several times already or tend to jump in quickly, this reminder to make space for others to speak first.
Introduce it by saying, "Let’s use a ‘step up, step back’ norm. If you’ve been quiet, we encourage you to step up and share your perspective. If you’ve already spoken, let’s step back so we can hear and learn from others.”
Track who has spoken; invite less vocal participants who haven’t shared yet.
-
Create a list of invitees, or jot down participant names during the discussion, and place a tick mark each time someone speaks.
-
Notice imbalances – If a few voices dominate, pause to open the floor to the rest of the group to help balance participation.
-
Invite quieter participants explicitly – Call on them by name in a supportive way, e.g.:
“We haven’t heard from [Name] yet—would you like to add anything?”
“I’d like to make space for voices we haven’t heard from yet.”
-
Keep the invitation optional – Allow participants to pass if they prefer not to speak.
Speaking – Use round-robin sharing or small group break-outs.
-
For high-level intention setting, and to help folks feel comfortable sharing in group discussions, use a round-robin while conducting an icebreaker. You can also share a word that conveys what participants hope to get out of the meeting to encourage participation.
-
For large meeting groups or addressing complex issues, consider using break-out rooms where participants can delve into particular aspects of group discussion points. Before setting the break-out room, make sure participants have selected one person to report out to the larger group when time has concluded.
Provide multiple modes for contribution: speaking, chat (if online), written notes, polls, sticky notes.
-
Written Notes – Provide index cards, sticky notes, or a shared Google Doc for people to jot ideas anonymously. Anonymity can ensure people still feel emboldened to share critical feedback and input on sensitive topics.
-
Sticky Notes on a Wall or Board – Great for in-person brainstorming, affinity mapping, or grouping similar ideas.
These tools can provide useful checks to get a quick snapshot of overall alignment, uncover any problems or concerns that need to be clarified or addresses, help identify areas of weaker support so that the group can discuss and improve proposals to reach a stronger consensus, and foster inclusion.
Design for Access and Inclusion
Ask about access needs in advance: At least one week before your meeting, make sure to ask participants if any special accommodations are needed to ensure everyone can participate. Asking early also signals that all participants are valued.
When to Ask: At least one week before the meeting if possible and whenever inviting a new participant or group.
How to Ask (Sample Language):
Types of Access Needs to Consider:
-
Mobility: Wheelchair access, close seating to exits, ramps, elevator use.
-
Language and Sensory: Interpretation (ASL, language), captioning, printed agendas, large-print or braille materials.
-
Cognitive/Processing: Agendas or presentations sent in advance, clear timeframes, and adequate times for breaks.
-
Other: Dietary needs if food is provided, childcare, transportation assistance.
Be mindful of power dynamics
Intervene if someone dominates, interrupts, or dismisses another’s perspective.
When to Intervene:
-
If someone speaks for a long time without allowing others in.
-
If someone interrupts before another person has finished.
-
If someone’s comment dismisses or minimizes another’s input.
Ways to Intervene:
Redirect the Floor
“Let’s pause and hear from others who haven’t spoken yet.”
“Thanks for sharing—can we hear from someone with a different perspective?”
Address Interruptions
"Hold on—let’s let [Name] finish their thought.”
“I want to make sure [Name] has space to finish before we respond.”
Reinforce Respect
“Different perspectives help us see the full picture. Let’s make space for all voices.”
“I hear your point, and I’d like to return to what [Name] shared so we can explore it fully.”
Additional Tools:
Step Up/Step Back: Remind the group to notice how much they’ve spoken and adjust.
Round-Robin: Go around the table giving everyone a turn.
Time Limits: Gently limit responses to 1–2 minutes during sensitive discussions.
Amplify Underrepresented Voices, Validate Contributions
In many spaces, people from underrepresented groups are often interrupted, overlooked, and their ideas are ignored or discredited until repeated by someone else. Amplifying and validating ensures their input is heard, attributed, and valued.
When to Do It:
-
When a participant’s comment is overlooked or not acknowledged.
-
When someone makes a strong point that gets derailed or moved past too quickly.
-
When a person from a marginalized group is spoken over, interrupted, or has their idea repeated without credit.
How to Amplify – Sample Facilitator Language:
-
Restate and Credit
“Building on what [Name] just shared...”
“I want to highlight [Name]’s point about [specific detail].”
“Let’s go back to what [Name] said—it’s important for our decision-making.”
-
Invite Expansion
“[Name], would you like to add more to that thought?”
“That’s a key insight—can you share an example?”
-
Correct Credit When Needed, if someone repeats an idea without acknowledgment:
“That’s similar to what [Name] mentioned earlier—[Name], do you want to elaborate?”
How to Validate Contributions:
-
Show appreciation: “Thank you for sharing your perspective. It’s definitely one we needed to hear.”
-
Connect it to the group’s goals: “That directly relates to our priority on [topic].”
-
Link it forward: “Let’s include [Name]’s point in the notes so it guides our next steps.”
Be Trauma-Informed
When discussing complex topics, it’s important to build frequent status checks into your meetings. If participants seem rattled, they may need to opt out of speaking in a particular moment due to emotional readiness, relevance to their role, or simply needing a break. Give them the option to pass or step out. Respecting this choice builds trust and creates a safe, inclusive, environment.
When to Offer:
-
During introductions, check-ins, or go-arounds.
-
When asking for input on a sensitive or high-stakes topic.
-
If someone appears uncomfortable or disengaged but hasn’t signaled why.
How to Allow People to Pass – Sample Facilitator Language:
-
“If you’d like to pass and come back later, that’s fine.”
-
“You’re welcome to pass if you’d prefer not to share right now.”
-
“You can say ‘pass’—no explanation needed.”
How to Allow People to Step Out:
-
Normalize it at the start:
“Feel free to step out if you need a break—restrooms are [location], and you can rejoin whenever you’re ready.”
-
Reinforce at key points:
“If you need a moment or need to step away, please do—just come back when you’re ready.”
-
For online meetings:
“If you need to step away from your screen, feel free to turn off your camera and rejoin the discussion when you’re ready.”
Avoid Forcing Personal Disclosures
Not everyone is ready or willing to share personal experiences, especially in group settings or on sensitive topics. Respecting boundaries helps maintain psychological safety and ensures participation is voluntary.
When to Be Mindful:
-
Icebreakers or check-ins that invite personal sharing or disclosure of personal experiences.
-
Discussions on sensitive issues (for example, race, trauma, health, finances, family).
-
Moments when someone appears hesitant, guarded, or visibly uncomfortable.
How to Avoid Forcing Disclosures:
-
Give Options: Use prompts that allow multiple levels of sharing and if necessary, model the prompt by sharing an example first.
Example: Instead of “Share a personal challenge you’ve faced,” try “Share a recent challenge you’ve faced—this can be from work, your community, or another area you feel comfortable discussing.”
-
Use “Opt-In” Language:
“If you’d like to share...” “You’re welcome to pass on this one.”
-
Model Neutral Examples: As a facilitator, demonstrate a low-disclosure response so participants see it’s acceptable.
-
Separate the Personal from the Conceptual: Invite people to speak from general knowledge or observations rather than personal experience if they prefer.
Sample Facilitator Language:
“You can share at whatever level you’re comfortable— personal, professional, or general.”
“If this prompt feels too personal, you can respond in another way or pass.”
“It’s okay to keep your comments general—you decide how much detail to give.”
Facilitator Tips
-
Confirm accommodations before the meeting and let participants know how their needs will be met.
-
If a request cannot be met, explore alternatives and communicate properly.
Facilitator Tip
-
Intervene early and respectfully—this maintains trust without shaming.
Facilitator Tip
-
Avoid singling out or pressuring someone after they’ve chosen to pass.
-
If multiple people pass or have chosen to opt out of the discussion, check if the format or timing needs adjusting
Facilitator Tip
-
Pay attention to nonverbal cues—if someone hesitates, slow down, restate that sharing is optional, and move on without pressure.
-
Never ask follow-up questions that push for more personal detail than someone has offered.
-
Avoid singling someone out to speak if the topic could be sensitive.
In Email/Invitation:
In Registration Form:
By Phone
“We want to make sure everyone can fully participate. Please let us know if you have any access needs—such as interpretation, printed materials in advance, or seating arrangements—by [date].”
“Do you have any access needs (e.g., mobility support, language interpretation, visual/hearing assistance, materials in advance)?”
“I want to make sure the meeting works well for you. Is there anything you need to participate fully?”
Succession Planning
2. Establish Term Limits or Rotation Schedules
-
Decide how long a facilitator or co-chair serves before rotating.
-
Stagger leadership changes to maintain continuity.
4. Prepare the Incoming Leader(s)
-
Provide access to all relevant meeting notes, priority trackers, contact lists, and shared drives.
-
Offer a shadowing period (e.g., 1–2 meetings) before they take the lead.
3. Define Selection Process
-
Determine how new leaders will be chosen (election, consensus appointment).
-
Consider criteria such as commitment, time availability, and trust within the group.
6. Review & Update Annually
-
Ensure the succession plan remains relevant and that backups are identified for all roles.
1. Identify Key Roles
-
List core leadership and facilitation responsibilities.
-
Note which roles are currently filled and by whom.
5. Announce the Transition
-
Share leadership changes with the full Partnership Table and relevant city staff.
-
Reinforce appreciation for the outgoing leader’s contributions.
A strong succession plan ensures that Partnership Table leadership remains consistent, effective, and trusted, even as individuals rotate out.
Step-by-Step Guide:
LONG-TERM OWNERSHIP PLANNING PROMPTS
Integrating the Partnership Table into Local Structures
Before ending your meetings, consider adding an agenda item to reflect about how to sustain the Partnership Table’s role in the long term. Use the below sample questions to help you start the discussion.
Which existing local networks, coalitions, or committees could “house” the Partnership Table’s work?
Can the Partnership Table be included in a city department’s regular meeting calendar or reporting process?
Are there CBO-led networks that could take the lead in convening?
Which local funding streams (public or philanthropic) could support ongoing meetings and facilitation?
How can the Table’s priorities be embedded in city strategic plans, climate action plans, or other official policy documents?
What role can local institutions (libraries, universities, faith-based organizations) play in hosting or resourcing meetings?
How will the Table ensure new members are fully oriented and that institutional knowledge is passed down?
How will the Table maintain connections with state, regional, or national networks for learning and advocacy?
CONSIDER ROTATING LEADERSHIP
Your partnership table may choose to rotate leadership and facilitation of meetings to encourage shared ownership, prevent burnout, and surface diverse perspectives.
To implement rotating leadership:
-
Create a facilitation roster: Decide in advance who will facilitate each meeting. Include co-facilitation opportunities to build skills.
-
Provide this or another facilitation toolkit: Share agendas, scripts, and norms so new facilitators have the support and tools they need to be successful.
-
Build in reflection: After each meeting, take 5 minutes to discuss what worked and what could be improved.
-
Encourage different roles: Even if someone isn’t ready to facilitate, they can still contribute by time-keeping, taking notes, or leading an activity.
-
Honor different styles: Not every facilitator will lead the same way; variety and different facilitation styles can keep the group dynamic and inclusive.
Communications Templates
The following templates are designed to assist local Partnership Table teams with inviting stakeholders to community meetings and other events. This sample content should be edit to fit with the culture and communications style of your partnership table.
MEETING INVITATIONS & REMINDERS
Reminder Text (for email or SMS)
FOLLOW-UP MESSAGES
Option A (with an attachment):
Option B (In-Email notes):
EXAMPLE SCHEDULING EMAIL
Subject: Partnership Table Meeting – [Date]
Dear [Name],
You are invited to the upcoming Partnership Table meeting for [City, ST].
Date: [Date]
Time: [Time]
Location: [Location or Zoom link]
We’ll be covering key updates, reviewing progress on priorities, and planning next steps.
Please confirm your attendance.
Best regards,
[Your Name]
Click icon to download template
Subject: Partnership Table Meeting Recap – [Date]
Dear [Name],
Thank you for attending the Partnership Table meeting on [Date].
Attached to this email are the meeting notes, along with a recap of the Action Items to be addressed in our next meeting, which will be held on [Date].
Please let me know if you have any questions.
Sincerely,
[Your Name]
Click icon to download template
Subject: Partnership Table Meeting Recap – [Date]
Dear [Name],
Thank you for attending the Partnership Table meeting on [Date].
Below you will find notes for meeting, along with a recap of the Action Items to be addressed in the next meeting, which is scheduled for [Date].
Please let me know if you have any questions.
Key Points: Decisions: Next Steps:
[Point 1] [Decision 1] [Step 1, Person Responsible, Due Date]
[Point 2] [Decision 2] [Step 2, Person Responsible, Due Date]
Sincerely,
[Your Name]
Click icon to download template
Subject: Partnership Table Meeting – Help Us Choose the Best Time
Hello [Name or “Partnership Table Members”],
We’re scheduling the next Partnership Table meeting and want to make sure as many people as possible can join. Please click the link below and mark all the dates/times that work for you:
[Insert Scheduling Link Here]
If you prefer to share your availability directly, you can reply to this message with your preferred dates/times.
Once the date is confirmed, we’ll send the meeting agenda and materials in advance.
Thank you for your continued participation and contributions to the Partnership Table.
Best,
[Your Name]
Relationship Building Tools
TIPS FOR ENGAGING CITY STAFF & AGENCIES
While the city staff who are already participating in your Partnership Table are clearly invested in its success, you may also find it useful to connect with new staff you haven’t met yet or with other departments whose work overlaps with your priorities. Here are some tips for building those new relationships effectively:
Be aware of resource realities: Many city departments operate within several constraints including limited budgets, staffing, and time. Keep your requests focused and manageable to show you value their time and capacity. Offer flexible meeting options, provide a short agenda beforehand, clearly state how much time you’ll need for meetings.
Be mindful of time constraints: Staff often juggle multiple high-priority projects. Offer flexible meeting options, keep agendas short, and clearly state how much time you’ll need.
Match their communication preferences: Ask how they prefer to be contacted email, phone, virtual meeting, or in-person—and stick to that method to make connecting easier. (Not all staff have city-issued cell phones or can give out personal numbers. If that’s the case, use official department lines or shared inboxes instead.)
Build rapport over time: Don’t only reach out only when you need something—share updates, invite them to events, and highlight successes.
Prepare and follow through: Have a clear purpose for each interaction, bring relevant materials, and send a brief follow-up recap so they can easily reference agreements and next steps.
Show appreciation: Recognize and publicly acknowledge their contributions in meetings or in follow-up notes. A simple thank-you builds trust and goodwill future collaboration.
STAKEHOLDER MAPPING
Purpose: Mapping stakeholders and key partners can help you better identify their roles, influence, and current level of engagement, so you can more effectively plan a targeted outreach strategy and enhance group collaboration.
Preparation: Using a whiteboard, a large sheet of paper, or the plain sign of some wrapping paper, use a marker or colored tape to create 4 boxes as shown at right. Draw triangles for the ends of arrows and label the sides and headings at the top of the boxes.
Instructions: Ask Participants to
-
List all individuals, organizations, agencies, or community groups connected to your work on notecards or sticky notes.
-
Note their role (e.g., decision-maker, influencer, service provider, resident leader).
-
Place the stakeholder cards in the quadrant that best suits that person, organization, or agency. (If a stakeholder is not at an extreme end, it is fine to place them toward the center.)
-
Once all the cards/notes have been placed, give participants around 2 minutes to look for patterns or characteristics related to similarly placed groups, or any groups that got placed in more than one square. Allow the group to share observations.
-
Lead a discussion around potential mutual benefits and opportunities for collaboration, or begin brainstorming on strategies to build the support base for the group project/priority.
RESOURCE LINKS
Additional examples stakeholder mapping word document templates to use:
Stakeholder Mapping Option # 1
Stakeholder Mapping Option # 2
Stakeholder Mapping Option # 3
Troubleshooting & Support
COMMON CHALLENGES & SUGGESTED SOLUTIONS
Drop-off in Attendance
-
Possible Causes: Competing priorities, meeting fatigue, unclear value of participation, lack of interest.
Solutions:
-
Include attendance expectations in resourcing agreements with PT CBOs.
-
Encourage consistent representation from each organization; if the usual representative cannot attend, a designated an alternate to attend as proxy.
-
Confirm regular attendance commitments from city agencies, departments, and staff.
-
Send meeting reminders and agendas in advance, and schedule meetings at times most convenient for the group.
-
Highlight concrete wins and progress at the start of each meeting to reinforce value.
Low Participation during Meetings
-
Possible Causes: Meetings dominated by a few voices, unclear roles, lack of engagement with the agenda.
Solutions:
-
Ensure each CBO and city representative has a meaningful role and a level of visibility in the PT’s work.
-
Use open-ended questions to invite contributions from quieter members.
-
Share agendas in advance and request input.
-
Incorporate guest speakers or spotlights on local projects.
-
Rotate facilitation or have members lead sections of the meeting.
-
Include occasional community site visits or social activities to strengthen relationships.
Unclear Next Steps or Follow-Through Gaps
-
Possible Causes: Vague action items, no assigned owners, or lack of deadlines.
Solutions:
-
Summarize clear next steps at the end of every meeting.
-
Assign a responsible person and deadline for each action item.
-
Use a simple tracker or shared document for accountability.
-
Review progress on prior action items at the start of each meeting.
Conflict or Tense Dynamics
-
Possible Causes: Differing priorities, historical grievances, or personal tensions.
Solutions:
-
Address tension early, acknowledge concerns, and restate shared purpose and group goals.
-
Use a neutral facilitator or mediator for particularly difficult discussions.
-
Meet with conflicting parties offline to seek resolution in a lower-pressure setting.
-
Focus discussions on facts, agreed-upon data, and forward-looking solutions
WHEN TO ASK FOR HELP
-
Repeated attendance issues that threaten the PT’s ability to function.
-
Persistent conflict between members that cannot be resolved with offline conversations.
-
Major misalignment with agreed-upon PT priorities or program requirements.
-
Disruptions to reporting, funding requirements, or deliverables.
Who to Ask for Help and How to Escalate:
-
Document the issue with dates, affected parties, and any attempted resolutions.
-
Inform TCG at sustainablecties@tcgcan.com and, if relevant, your SCF or TA Provider contact.
Further Readings
For more information and examples of cities and communities engaging the public in shaping policies and practices through community engagement, consider checking out Municipal Research and Services Center’s resource page.
Youth Engagement Programs: Learn how cities establish youth councils, commissions, and other youth- led initiatives that help young people build skills and contribute to their communities.
Citizen Academies & Public Education Programs: Discover programs that equip residents with the knowledge to engage more effectively in local government.
Volunteer Programs: Find sample policies, application forms, and service agreements that help communities connect resident talent and interests with service opportunities.
Community Newsletters: See examples of how local governments use newsletters to share updates on events, programs, and community news.
Surveys: Access guidance on designing and conducting surveys that capture meaningful input from community members.